Using Experimental Procedures
An experimental procedure consists of a one or more steps used to define the experimental conditions of the test. A typical test contains multiple steps, including a conditioning step, the test step, and an End of Test (EOT) step. Test steps that generate data are represented as steps on the graph and spreadsheet.
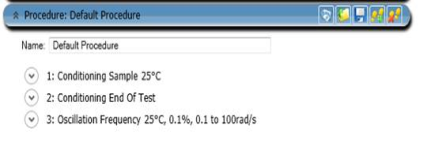
Procedures can be saved for later retrieval. Pre-defined procedures are available for application-specific tests.
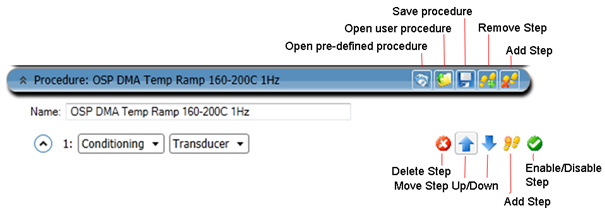
To begin setting up a procedure, select Experimenttab > Setup. The Experiment view displays. To display the step options (Delete, Insert step, Enable/Disable step), move the mouse pointer to the right of the step.
Defining a Procedure
- Click the Procedure bar to display the Step bar(s), if not visible.
- If a test step is selected, select the test mode, then the test type from the drop-down list of available options. Based on the information selected, the parameters for that step will be displayed.
- Enter the desired parameters.
- Click Add Step
 on the Procedure bar (refer to Inserting a Step). A copy of the selected step will be added to the end of the procedure.
- Repeat steps 2–4 until the desired procedure is developed. If desired, save the procedure for future recall.
See Also
Reordering Procedure Steps
Back to top
Opening and Collapsing Step Views
- To display information about a selected step, click the Procedure bar.
- Click the bar again to close it.
- To collapse or display all procedure steps, hold down Shift and click a Procedure bar.
Saving a Procedure
To save a procedure after creating it, click Save  on the Procedure bar. Choose the location for your procedure files and name the file, then click Save.
- NOTE: When changing the filename, a warning message displays indicating that the filename is different from the procedure name.
Back to top
Restoring a Saved Procedure
To restore a saved custom procedure file, click File Open  on the Procedure bar. This allows you to select the desired procedure file from the Open window. Once loaded, the selected file will set the mode, signals, test, advanced and post-test conditions for the run.
Back to top
Removing a Procedure Step
To remove a step from the procedure:
- Access the procedure.
- Click on the desired step to be deleted from the procedure.
- Select Delete
 on the associated step.
Back to top
Reordering Procedure Steps
To change the order of the steps in a procedure:
- Access the desired procedure.
- Click on the desired step.
- Use the Move Up
 and Move Down
  buttons associated with the step until the step is in the desired position.
Back to top
Disabling Procedure Steps
It may be desired to run a particular procedure but not run one of the steps in the tests.
To disable a step, follow these steps:
- Access the desired procedure.
- Click on the desired step
- Click Enable/Disable
 . When disabled, the Step bar is grayed out and the Disable icon is a green circle. To re-enable (display) this step, click this button again.
Back to top
Inserting Procedure Steps
To insert a step in a procedure:
- Access the desired procedure.
- Click on the desired step.
- Click Insert Step
 on the Step bar. A new step is added after the selected step within the procedure, with the new step containing the same parameters as the selected step. Reorder the position of the step within the procedure as desired.
Back to top
Displaying a Procedure Summary
To display a summary of the selected procedure:
- Click the Procedure bar of the step to be summarized; a textural summary of the step displays.
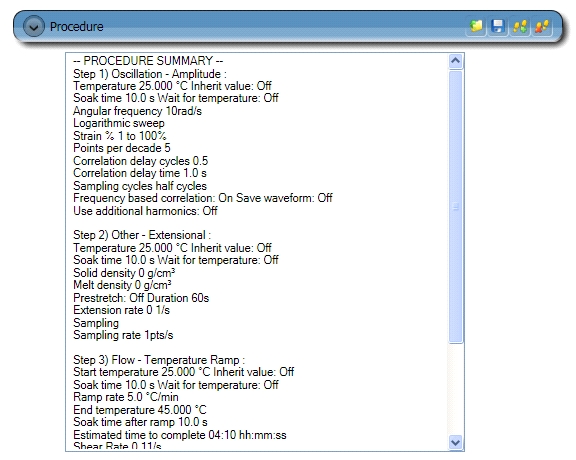
- To print, right-click from within the Procedure Summary block and select Print.
Guidelines for Setting Up a Procedure
Depending on the testing goals, a procedure can be as simple as a single test mode step or as sophisticated as a series of conditioning and test mode steps. A test mode step is an active step and defines environmental and testing conditions. When a procedure includes only test mode steps, the current transducer, motor, axial force control settings remain unchanged. This is the typical approach when setting up a procedure for immediate execution.
If a procedure is saved to be used at a later time or on a different instrument, however, we recommend that you include conditioning steps which define instrument settings. This will ensure that the procedure will always be executed with the same instrument settings.
A well-defined procedure should include a sample conditioning step to set the environmental conditions, an EOT conditioning step to set the environmental, axial force control, motor and transducer conditions at the end of a test, and a transducer conditioning step prior to the test mode step to set the transducer conditions.
- NOTES:
- The EOT conditioning step can be placed anywhere in a procedure since it is a passive step and sets the conditions when the procedure is terminated. Inserting the EOT conditioning step at the beginning of a procedure ensures that the desired EOT conditions are set even if the test is terminated prematurely due to user intervention or due to an instrument termination command (Torque overload for example). If a procedure is terminated before the EOT conditioning step has been executed, the default end of test conditions is used. More than one EOT conditioning step can be used in a procedure and the position in the procedure defines which EOT conditions are to be used when the test is terminated normally or prematurely. Note that a procedure is executed step by step starting at step 1.
- Sample, transducer, etc. conditioning steps can be inserted between test mode steps to change the axial force control, motor, transducer conditions during a procedure.
- Dielectric, UV curing, electrorheology steps are passive conditioning steps and used to switch features ON/OFF during test mode steps.
- Sample loading steps are active conditioning steps and are typically inserted in a procedure after the sample conditioning step, however before the transducer conditioning step.
Using Pre-Defined Procedures
For specific applications, a pre-defined procedure can be used – for example, when running tribology tests using the Tribo-Rheometry Accessory. To load a pre-defined procedure file, click Open Procedure Template on the Procedure bar. Select the desired procedure file from the Open window. Once loaded, the selected file will set the mode, signals, test, advanced and post-test conditions for the run.
Pre-defined procedure files currently in the Procedure Templates folder:
- Tribo-Rheometry Flow Ramp (ARES-G2 & DHR)
- Tribo-Rheometry Flow Sweep (ARES-G2 & DHR)
- Creep-Recovery_Polymers (ARES-G2)
- Creep-Recovery_Yield (ARES-G2)
Note that the pre-defined procedures are read-only.
When the pre-defined procedures have been modified, they can be saved for later retrieval in the default procedure folder using the Save button.
See Also
Touring the TRIOS Workspace
Understanding the Experiment Pane
